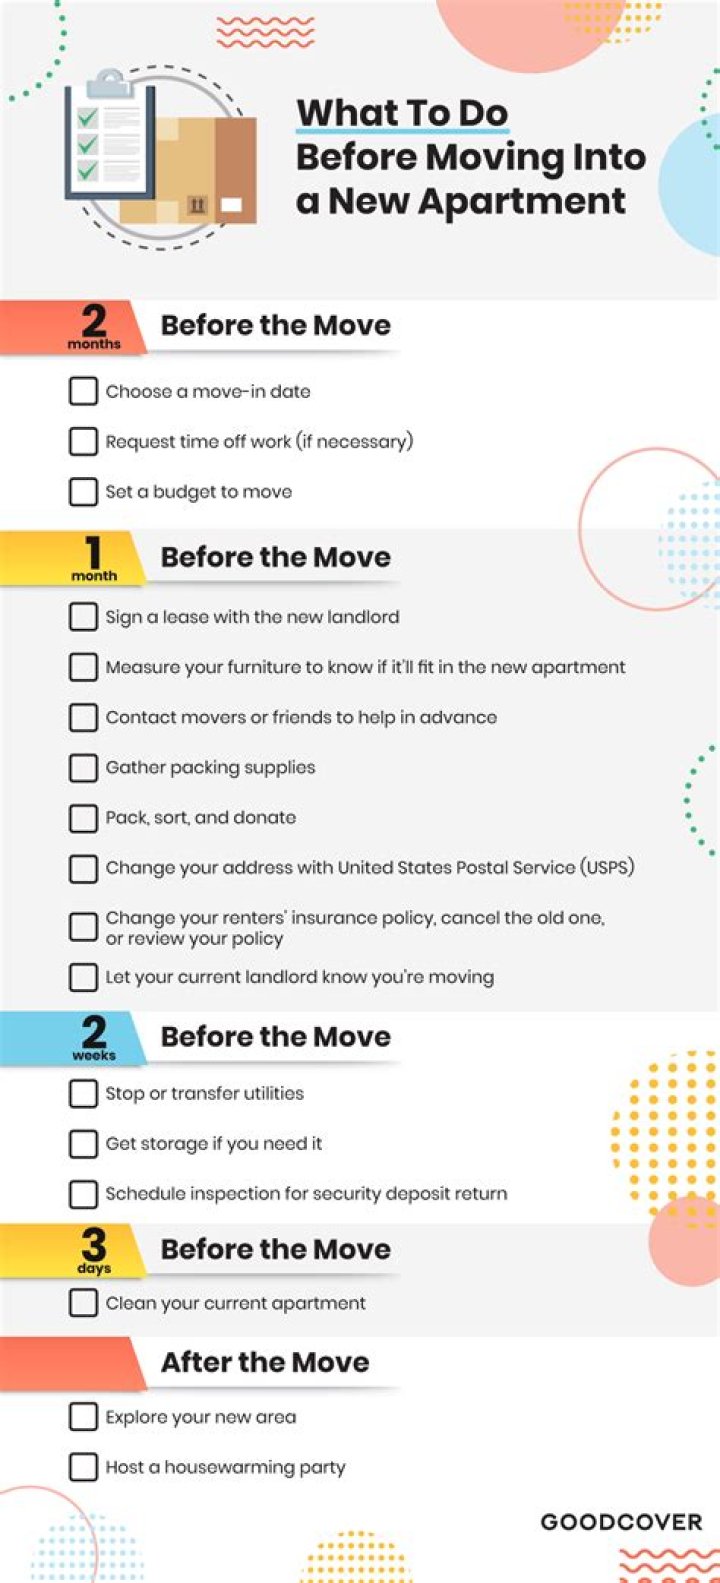
How to show or hide facebook posts for certain people

William Clark
Updated on March 29, 2026
For all of its advantages, Facebook Messenger isn’t the best for people who like their privacy. The popular app lets all your Facebook friends know when you’re online by default, as well as how long you’ve been idle, making it impossible to check up with one person without leaving yourself vulnerable to your entire friends list. Luckily, this feature is one you can turn off.
By default, the activity status is on, and when it is, friends and contacts will see a green dot or a time next to your profile picture indicating when you were last active. These statuses show up in other areas of the Facebook and Messenger apps, as well. And if your friends have activity status enabled, you’ll see the same thing for them.
Facebook used to make disabling your Active Status tricky, especially on iOS. We suspect that the company did not want users turning statuses off quickly, possibly to make it more likely for friends you contact you more frequently. However, with Facebook implementing better privacy controls and its initiative to make its Messenger app similar on both iPhone models and Android phones, the option is now identical on both platforms and makes a lot more sense than it used to.
- Don’t Miss: The 4 Best Phones for Privacy & Security
Turn Off Your Active Status on Android or iOS
To hide your activity status, tap your profile icon in the top left to open the Settings menu. Then, tap “Active Status” under the Profile settings. Next, tap the slider next to “Show when you’re active,” then select “Turn Off” on the pop-up, and your Active Status will be disabled.
How Things Appear After Disabling Active Status
You can still message friends and start new conversations, but none of your contacts will see you as active. Also, you won’t be able to see if anyone of your friends are active either, nor how long they’ve been idle. If you need to re-enable the status, follow the above directions again, or tap the “People” tab at the bottom of the display and tap “Turn On.”
alt=”How to Hide Your Active Status in Facebook Messenger to Go Incognito Online” width=”532″ height=”532″ />
There is one catch to this, however. Facebook states, “If you turn off Active Status in one place, you’ll still appear active or recently active anywhere else you’re using Facebook or Messenger unless you also turn off the setting in those places.” What that means is that if you use Facebook or Messenger on other devices, you need to disable it there too or when you use those devices you’re Active Status will be, well, active.
This article was produced during Gadget Hacks’ special coverage on texting, instant messaging, calling, and audio/video chatting with your smartphone. Check out the whole Chat series.
Keep Your Connection Secure Without a Monthly Bill. Get a lifetime subscription to VPN Unlimited for all your devices with a one-time purchase from the new Gadget Hacks Shop, and watch Hulu or Netflix without regional restrictions, increase security when browsing on public networks, and more.
Lori KaufmanLori Kaufman
Writer
Lori Kaufman is a technology expert with 25 years of experience. She’s been a senior technical writer, worked as a programmer, and has even run her own multi-location business. Read more.
Facebook is a great way to keep in touch with friends and family and let them know what’s going on in your life. However, what if you want to post something that you don’t want a specific person to see?
It’s easy to hide a post from certain people as well as showing a post to only certain people. To hide a post from a certain person, log in to your Facebook account in a browser and write your post in the Status box. Click the “Friends” button to the left of the “Post” button and then click “More Options.”
NOTE: The name on the button to the left of the “Post” button changes depending on your selection for who should see the post.
The drop-down list expands to include additional options. Click “Custom.”
The “Custom Privacy” dialog box displays. In the “Don’t share this with” section, click in the “These people or lists” box and start typing the name of the person with whom you don’t want to share the post. A list of matching names displays as you type. Click the name of the desired person.
The name of the person displays in the “These people or lists” section.
You can also share a post only with specific people. By default, all your Friends are added into the “These people or lists” box in the “Share this with” section. If you only want to share the current post with a certain person, click the “X” on the “Friends” box to remove it.
Add the desired person to the “These people or lists” box in the “Share this with” section the same way described above for the “Don’t share this with” section.
NOTE: If you choose a specific person with whom you want to share a post, you don’t need to specify anyone in the “Don’t share this with” section. Your post will only be shared with the people you chose in the “Share this with” section.
Click “Save Changes” to return to your post.
You can check the status of who will see your post by moving your mouse over the “Custom” button. The current settings for who can see this post display in a popup above the button.
NOTE: This is the same button as the “Friends” button we talked about at the beginning of this article. The name has now changed to reflect the face that we select custom settings for who can see the post.
Click “Post” to share your post with the chosen people.
You can also change this setting for all future posts. You may want to do this if there’s a person you don’t want to “unfriend” but you don’t want them to see any of your posts. Click the down arrow on the right side of the top blue bar on your Facebook page. Select “Settings” from the drop-down menu.
If you were in the middle of writing a post that you hadn’t posted yet, the following message displays. Click “Leave This Page” to go to the “Settings” page. Don’t worry, your post will still be there when you return to this page.
On the “Settings” page, click “Privacy” in the list of options on the left.
The “Privacy Settings and Tools” screen displays. In the “Who can see my stuff?” section, click “Edit” to the right of “Who can see future posts?”
The section expands to display more options. Notice that the custom selections you made directly from the post are displayed when you move your mouse over the “Custom” button. Click the “Custom” button to access the options.
The “Custom Privacy” dialog box displays, just like when you clicked the “Friends” button as discussed earlier in this article. Make any changes you want and click “Save Changes.” These settings will be applied to all future posts.
When you are returned to the “Privacy Settings and Tools” screen, a “Remember” box displays telling you that the setting you just changed is the same one you can change right where you post, and you’ve updated it at the post as well.
- › The Best Gaming Keyboards of 2021: Be on Top of Your Game
- › Why Sublime Text Is Great For Writers, Not Just Programmers
- › What Is a ULED TV, and How Is It Different?
- › Why Professionals Will Actually Want a 2021 MacBook Pro
- › How to Add Images to Questions in Google Forms
Lori Kaufman
Lori Kaufman is a technology expert with 25 years of experience. She’s been a senior technical writer, worked as a programmer, and has even run her own multi-location business.
Read Full Bio »
Facebook is the place where we get in touch with our friends and relatives. We might meet someone a few days back and will add them to friend’s list on Facebook. We also maintain some lists and groups. Most of us share videos, photos and status with everyone on Facebook. Some videos, photos or Facebook Post might be in such a way that, we want them to be visible to only few people or lists. We want to share that particular Facebook post to only specific people and do not everyone to see that. We have a solution for that and this article will help you to do so.
Share videos, photos and status on Facebook to specific people only
It might be your party video, party photos or status regarding your mood which you want to share with only specific people. Facebook allows us to share Facebook posts to specific people with just few steps and is easy to do. Here, whenever I mention Facebook posts it includes videos, photos, status and everything you share on Facebook. Just follow the below steps.
STEP 1: Log in to your Facebook account and look for what you want to share. It might be status, post from some page or group, video or anything.
STEP 2: When you click on the “Share” button, it shows that it might be sharing with Public or Friends.
STEP 3: If you do not want to share it with public or friends, then click on the public or friends (what it shows) button and click on More Options.
STEP 4: Now, it shows some more options like “Only Me”, “Custom” and some groups and lists you are member of. Click on “Custom” option.
STEP 5: Custom Privacy windows pops up with two options as Share this with and Don’t share this with.
STEP 6: By default it shows some options like Friends, Friends of Friends. If you do not want to share with them, click on the “X” mark and it gets removed.
STEP 7: If you want to share only with very less number of people, then you can start typing the profile names of the people or lists name in Share this with. This would be helpful if you want to share any Facebook with very less number of people as you need to type name of each and every individual.
This helps you to share the Facebook post with specific list of people. For example, I want to share with members of my family and I mention only that.
STEP 8: In other case, if you want to share with everyone except with specific people or members in the list, then you start typing the names of people or lists name in Don’t share this with. For example, I do not want to share my party photos with family (with members of family list). I simply mention family list in this field.
STEP 9: Once done with sharing priorities, click on “Save Changes” button. Now, you can see that this Facebook post is shared with only custom (Family).
Hover your mouse to Custom button and it shows with whom this post is being shared with. Then, click on Share Link button to share the respective post.
Conclusion
It is important to remember that, only this specific post will be shared with specific people and lists and it does not show any impact on the posts which you have shared previously. This is very helpful to use Facebook smartly and to make use of it to the maximum in a better way. If you have any more information on using Facebook smartly, please do share with us through comments.
- Like the article? Share it!
Related articles
How To Log Out Of Facebook Messenger On Android, iOS
How To Download Facebook Video On Android
How To Download Or Backup Facebook Messages Or Conversations
How To Import Facebook Events In Google Calendar, Outlook Calendar, iCloud Calendar
1 comment
Can you share a post to a group if there is no share option below the post? There is only like or comment.
Most of the Facebook users including me don’t’ like to share their personal information to the whole world. Facebook is a wide network with billions of users that connects us with friends, families, friends of friends etc. We do not know all those Facebook friends in our real life and so sharing specific personal information to them is not a good idea. This doesn’t means to unfriend them or completely block them from viewing your timeline. Just hide certain posts that you think it to be personal, so that you can maintain your privacy.
Every one of us will often have a business acquaintances or an annoying family member in Facebook whom we cannot unfriend, but most of the time we get tired of having them in our connection. Facebook by considering all that social pressures in mind offers you various privacy settings which you can tune it utmost. Here in this post we will see how to hide Facebook posts from certain people without unfriending them.
How to hide Facebook posts from certain people
Now let’s see how to hide certain posts such as status message, photos, link or a video from certain people.
Step 1: Whenever you post a new entry in your Facebook status tab (such as status message, photos and videos) you will see a drop down option close next to post or share button. Just click and drop down.
Step 2: You will now have four options to choose from such as Public, Friends, Only me and custom. The default one may be Public, friends or only me depending upon your global privacy settings.
Step 3: To hide a Facebook status post from certain people you have to choose the custom option. This custom privacy option enables you to share a post just to certain people, list you manage or hiding it from a group or specific people.
Step 4: Just choose whom you want to share your post and whom you don’t want. If you wish to hide your post from certain peoples then just type in an individual name or group name in “don’t share this with” box (for example: Your mom, dad, boss or ex names) and Facebook will auto completes.
Step 5: When done click on save changes and post your update without any bother. To make the process easy every time you can create a list and organize people in to it.
Basically the process is same for restricting or hiding links, photos and videos from specific people. You will have the privacy option each time when you attach a file or choose a photo or video to upload.
Maintaining privacy in social networks in very much important because it determines who we are, how we are and how we want to be. You have to decide which part of your life to share and whom to share with. Check out these must know privacy settings in Facebook.
Hope this post guided you to hide your Facebook posts from certain people. Share it and post your comments below.
Facebook offers a great — and free — way to connect with friends and family, but if you are not careful about your security settings, your site activity can be published for anyone to view. Comments you leave on other posts, for example, are displayed and made available for liking and commenting by other users as well. With user blocking enabled, you can unfriend specific users and hide your comments from their view plus prohibit the user from communicating directly with you on Facebook. Other privacy settings allow you adjust the overall audience of your posts and shared items.
Explore this article
1 Block a User
2 Click the Privacy Shortcuts” icon
Click the “Privacy Shortcuts” icon, resembling a padlock with three horizontal lines, at the top right of any Facebook page. Select “How do I stop someone from bothering me?”
3 Enter the name or email address
Enter the name or email address of the individual you wish to block and click “Block.”
4 Select the person
Select the person you want to block from the list of users that dislays. Confirm your request to block by clicking “Block [User Name].”
5 Individual Post Privacy Settings
6 Click the Friends drop-down
Click the “Friends” drop-down next to the “Post” button on any new post — for example, a new status update or a shared link.
7 Select the audience for your post
Select the audience for your post. See Tips for information about audience selection.
8 Click Post
Click “Post” to make the post live.
9 Past and Future Post Privacy Settings
10 Select the gear icon
Select the gear icon at the top right of any Facebook page and select “Privacy Settings” from the drop-down menu.
11 Click Edit next
Click “Edit” next to “Who can see your future posts?” and adjust the audience for all future posts. Additionally, you can limit previous posts by selecting the “Limit Past Posts” link, clicking “Limit Old Posts” and then “Confirm.” See Tips for information about selecting an audience.
12 Click Close
Click “Close” to save your privacy setting changes.
- The other user will not be notified when you block him.
- If you are unable to find a user by searching in the "Privacy Shortcuts," navigate to the user’s timeline, select the gear icon to the left of his name and choose "Report/Block This Person" from the drop-down menu. If you are still unable to locate the user’s page, he may no longer use Facebook or have restricted his privacy settings.
- When you select "Limit Old Posts," any content you have shared with "Friends of Friends" or "Public" will be changed to a "Friends" audience.
- A post with a "Public" audience will be visible to anyone on the Internet. A "Friends of Friends" audience includes your friends as well as the friends of your friends. This option is also the maximum audience option available to minors posting on Facebook. A "Friends" audience displays posts only to your Facebook friends — and will expand to include additional non-friend users who are also tagged within the post. A post with an "Only Me" audience is visible only to you — though it will expand to include additional users who are also tagged within the post. A "Custom" audience can be configured to include or block specific users.
references
- 1 Facebook: What Is Blocking? What Happens When I Block Someone?
- 2 Facebook: How Do I Block Someone?
- 3 Facebook: When I Share Something, How Do I Choose Who Can See It?
- 4 Facebook: Basic Privacy Settings & Tools
- 5 Facebook: How Do I Choose Who Can See Previous Posts on My Timeline?
- 6 Facebook: What Audiences Can I Choose from When I Share?
About the Author
Based in Tampa, Fla., Danielle Fernandez been writing, editing and illustrating all things technology, lifestyle and education since 1999. Her work has appeared in the Tampa Tribune, Working Mother magazine, and a variety of technical publications, including BICSI's "Telecommunications Distribution Methods Manual." Fernandez holds a bachelor's degree in English from the University of South Florida.
Lots of people add you as friends on facebook including people who drop comments you don’t really like that much. You might not wish to totally remove this people because of certain personal reasons and the best thing to do in such a situation is to hide your updates and photos from them. It might even be your boss at work, your parent, your teacher at school or someone you can’t definitely remove from your list. Hiding your status updates and uploaded photos from them can be the perfect way out. So how do you get this done?
Everytime you post a status update or upload a new photo, you can easily use the inline audience selector to hide the post from certain people just before posting.
– Select Custom from the list
– Clicking on custom shows a box as shown below:
– Just type name of the person and slect from the suggestions. Save the settings when you’re done.
Another way to do this is by choosing the default privacy settings as Custom.
Selecting custom privacy settings shows the same popup box explained earlier where you list the names of those you want to hide your status updates from.
Now more than ever, it's important to curate what pops up on your social media feeds. Here's how to delete Facebook posts from your Timeline one by one or in bulk.
Facebook is all too keen to remind you of the past. Remember that concert you went to three years ago? That person you friended nine years ago? That photo you snapped on vacation last decade? No worries; Facebook will make sure you never forget.
But now more than ever, it’s important to curate what pops up on your social media feeds, lest a potential employer or date stumble upon an ill-advised photo, comment, or like.
If you’re sick of cringing every time you log into Facebook, it might be time to rid your account of aging memes and reminders of your 2008-era frosted tips phase. You don’t have to nuke your entire account, though. Here’s a more civilized solution for social media cleanup.
Review Your Facebook Profile
First, it may be informative to see what your profile looks like to people who aren’t on your friends list. Go to your Facebook profile, open the three-dot menu next to the Edit Profile button (Add to Story on mobile), and click the View As “eye” icon. This will display your profile as it looks to the general public, by displaying everything on your profile that is set to Public.
Delete Facebook Posts
Facebook makes it easy to delete your old posts with the Activity Log. Go to your profile, click the three-dot menu, and select Activity Log. This will show you every action you, or another user, has taken on your Timeline, including reactions, shares, comments, tags, and posts. The results can be filtered by date or a specific person.
On desktop, you can scroll through all your past actions on Facebook, or choose a category under the Activity Types header to view your posts, tags, or interactions. Click the Timeline, Photo and Tag Review drop-down to filter specific tags. Mobile users must select nested categories to view posts, tags, interactions, and more specific actions.
When you come across something you want to remove, select the three-dot menu to delete, hide, or archive; unlike a comment; or remove tag. If you wish to remove multiple posts at a time, tick the box next to the actions, then select Archive or Trash on the top right.
Hide Facebook Posts
It’s possible to limit the visibility of old photos and posts by making them private instead of deleting them entirely. From your Timeline, click the ellipsis next to the post you want to hide, select Edit Audience (Edit Privacy on mobile), then select who should have permission to view the post. Choose Only me to hide it from everyone else. To only hide the post from certain people, select Friends except. or Specific friends. to include or exclude certain friends.
Facebook also has a tool to hide public Timeline posts en masse. To do this, click the arrow in the top-right corner of your profile and navigate to Settings & Privacy > Settings > Privacy. Click the Limit Past Posts link to open a warning advising that all your public posts will be converted to Friends only. If that’s okay, click the Limit Past Posts button and your public posts will only be visible to those on your friends list.
On mobile, tap the hamburger icon and select Settings & Privacy > Settings > Privacy Settings > Limit who can see past posts. Here, you can also edit how future posts will appear.
Download Your Facebook Data
Don’t want to lose your Facebook information forever? You can download a copy of your entire Facebook Timeline by navigating to Settings & Privacy > Settings > Your Facebook Information. Select the View link next to Download Your Information.
Choose what should and should not be included in the download, then click Create Files to download your Facebook information to your computer. Once a file is created, it can always be redownloaded from the Available Copies tab.
Like What You’re Reading?
Sign up for Tips & Tricks newsletter for expert advice to get the most out of your technology.
This newsletter may contain advertising, deals, or affiliate links. Subscribing to a newsletter indicates your consent to our Terms of Use and Privacy Policy. You may unsubscribe from the newsletters at any time.
Facebook is great place to keep in touch with your friends and relatives. Facebook is place to share your life events and other interesting things about your daily life with your friends and other members which are connected with you on Facebook.But sharing your daily updates with all Facebook friends is not worthy.So their is any way to hide your Facebook posts for certain people? or what if you want to post something that you don’t want a specific person to see?Don’t be worry its very simple to hide your Facebook posts from certain people.
Table of Contents
Hide a post from certain people:
Step 1: Log into your Facebook account and write your post in the status box.
Step 2: Now click the Public or friends left of the Post button (The name on the button to the left of the Post button changes depending on your selection for who should see the post.) then click on More Options.
Step 3 : By clicking on More Options your drop down list will expand with additional options then click on custom option.
Step 4: Now Custom privacy pop up appears on screen. In the Don’t share this with section, click in the These people or lists box and start typing the name of the person with whom you don’t want to share the post. A list of matching names displays as you type. Click the name of the person which you don’t want to share the post and save the changes and share your post.
Thus you can hide your Facebook post from certain people or single person.You can also hide your all future posts from a person or people.
How to hide your all future posts from a person or people:
Step 1: Login into your Facebook account and go to in Settings.
Step 2: Now your on General account settings page,Choose Privacy from the left-hand menu.
Step 3: By clicking on privacy new privacy settings and tools page appears on your computer screen.Now under the Who can see my stuff? heading, choose who can see your future posts? and click Edit.Step 4: Now pull-down menu from the left of the Post button,click on More Options and choose Custom.
Step 5: Under the “Don’t share this with” heading, type in the names of any people you don’t want to see any of your posts from now on.And click the Save Changes button and that’s it.Thus you can hide your all Facebook future posts from a person or people.
You can also share a post only with specific people. In future i will write post about how to show your Facebook posts with certain people.
Nearly everyone has a Facebook account, and people use it for all sorts of things: watching videos with the sound off, looking at your bestie’s vacation pics, or just talking to friends and family who live far away. But a lot of younger users tend to favor other social media platforms these days. Why? Because of the garbage that overwhelms the News Feed. As if the borked algorithm isn’t annoying enough to deal with, users also have to sift crappy comments. Luckily, you can start hiding comments on Facebook.
Rather than logging out or deleting the app entirely, there are quick and easy ways of cleaning up the comments section on Facebook.
Before we get into it, however, here’s a quick tutorial on the difference between hiding a comment, deleting a comment, and reporting a comment.
Hide, delete, or report?
Hiding comments on Facebook will simply make the comment disappear from your point of view—the person who posted it as well as any common friends you share with them will still be able to view it. You can hide a Facebook comment from specific people, like an ex or your parents. You can hide Facebook comments that have grammatical errors. Basically, when you don’t like a comment but aren’t sure if you want it gone forever, this is the solution.
Deleting the comment will remove it completely and forever, so be sure you really want it gone before choosing this option! You, the person who posted it, and the friends you have in common will no longer be able to see it. You can delete duplicate comments. You can delete comments that spoil TV shows, books, or movies. You can delete comments that blurt out your secrets without your consent. These are instances where hiding a comment option may not be enough.
Finally, reporting a comment is reserved for comments that are truly, irrevocably offensive. It subjects the comment to Facebook for further review and if it does violate Facebook’s standards for acceptable content, it will be deleted. (Here’s more information on reporting things on Facebook.)
Now that we’re clear on the terms, we can talk specifically about hiding a comment on Facebook.
Cleaning up Facebook comments via browser
Hiding comments on your personal Facebook timeline through your web browser is actually pretty straightforward. Click on “Comment” under the post in question to expand the reply section. When you find a comment you’d rather not see, hover your cursor to the right of it until you see the three dots. Clicking on the three dots will give you the option to either “Delete” or “Hide comment”.
You can always “unhide” a comment if you want it to show back up.
If you find that you would rather not read some of the Facebook comments that appear on other people’s posts, not to worry, you can also hide comments on your contacts’ posts. More importantly, you can also hide comments on content posted by Facebook pages you follow. (Goodbye, trolls!)
You can do it through your web browser by once again hovering your cursor to the right of the comment, tapping on the three dots, and clicking “Hide comment”.
Same rules apply as above: You’re the only one who remains oblivious to the hidden comment; everybody else can still see it. You can also unhide it whenever you want. The only thing that changes is you cannot delete the comment yourself. You can, however, report the comment to Facebook, as a last resort.
Hiding Facebook comments via the Facebook app
To get started, tap “Comment” on the post to show you all the comments posted in reaction to it. Long press the comment you want to hide to pull up the menu and tap “Hide comment.”
Once you do this, the comment will be replaced with a notice that says “This comment has been hidden” and will remain in the comment section of the post, but it will be grayed out. And just like in the web browser, you can also unhide it: Simply long-press the grayed-out message and choose “Unhide comment.”
If the comment you wish to hide is in the comment section of a Facebook page you follow or a friend’s post, you can follow the same procedure as above: Long press on the comment and choose “Hide comment.” You can unhide it if and when you want to see the comment again. Again, if the comment goes beyond the normal level of offensive, you can choose to report it.
Jam Kotenko
Jam Kotenko is a technology reporter who specializes in coverage of Instagram, Facebook, and other social media apps. Her work has been published by Digital Trends, Bustle, and Gotta Be Mobile.
FTC report reveals ‘staggering’ amount of data big telecom is collection on you
Here’s how a hacker was able to blow up Trump’s new free speech site
Scammers impersonating Amazon stole $27 million from victims in a year
In order to use Trump’s new social site, you can’t post like Trump